Battery switch on travel trailer function is crucial for managing your RV’s power. Understanding how to use your battery switch correctly ensures safe and efficient operation, preventing potential electrical issues and maximizing battery life. This guide breaks down the different types of switches, their functionalities, and how to troubleshoot common problems. Get ready to become a power management pro!
We’ll cover everything from choosing the right switch for your setup to safely connecting and disconnecting batteries, integrating solar panels and inverters, and resolving common issues. Whether you’re a seasoned RVer or a newbie, this information will empower you to confidently manage your travel trailer’s power system.
Function and Purpose of Battery Switches
A battery switch in your travel trailer is a crucial component that controls the flow of power from your various power sources. Think of it as a central command center for your trailer’s electrical system, allowing you to selectively use power from your onboard batteries, shore power hookup, or generator. Understanding its function is key to safe and efficient RVing.The primary function of a battery switch is to isolate and connect your trailer’s house batteries to the rest of the electrical system.
This allows you to manage power flow, preventing accidental discharge of your batteries when not needed and protecting your sensitive electronics. It essentially acts as an on/off switch for your batteries, but with added functionality for managing power from multiple sources.
Managing Power from Multiple Sources
A battery switch facilitates seamless transitions between different power sources. When you’re connected to shore power at a campground, the switch allows you to charge your batteries while simultaneously powering your appliances. Similarly, if you’re using a generator, the switch enables you to power your trailer and charge your batteries from the generator’s output. When disconnected from shore power and without generator power, the switch allows you to draw power directly from your batteries to run essential systems, such as lights and a refrigerator.
This prevents unexpected power failures and ensures your appliances are powered regardless of the power source.
Safety Implications of Improper Battery Switch Usage
Improper use of the battery switch can lead to several safety issues. Leaving the switch in the “on” position while connected to shore power or a generator, for instance, might lead to overcharging and potentially damage your batteries. Conversely, leaving it in the “off” position while needing battery power could leave you without lights or other crucial systems.
So, you’re planning a trip? Awesome! First things first: get yourself sorted with travel insurance. Check out Aon travel insurance for some solid coverage options. Then, if you’re an audiophile like me, you’ll want to consider your listening experience on the go. Planning your audiophile travel setup beforehand is key to enjoying your favorite tunes wherever you are.
Don’t forget your noise-cancelling headphones!
Furthermore, incorrect switching procedures can create dangerous electrical arcs or shorts, potentially leading to fires or electrical shocks. Always refer to your RV’s owner’s manual for the correct switching procedures and safe operating practices. Understanding the different positions of your battery switch – typically “off,” “battery,” “both,” and “shore” – is crucial to avoiding these problems.
Connecting and Disconnecting Batteries
Properly connecting and disconnecting your travel trailer batteries using a battery switch is crucial for safety and maintaining the lifespan of your batteries. A battery switch allows you to isolate batteries, preventing accidental drain and protecting your sensitive electronics. This section details the safe and efficient procedures for managing your battery system.
Safe Battery Connection and Disconnection Procedure
Before you begin any work on your battery system, always disconnect the negative (-) terminal first. This helps prevent accidental shorts and potential sparks. Remember to wear appropriate safety glasses and gloves.
- Turn off all loads: Ensure that all appliances and electronics connected to your battery system are switched off.
- Locate the battery switch: Identify the location of your battery switch, typically found near your batteries or inside a convenient access panel.
- Disconnect the negative terminal (if disconnecting): Using a wrench, carefully loosen and remove the negative (-) cable clamp from the battery post. Set the cable aside.
- Operate the battery switch: If disconnecting, switch the battery switch to the “OFF” position. If connecting, switch the battery switch to the “ON” position, ensuring power is routed correctly to your chosen battery bank.
- Connect the negative terminal (if connecting): Securely attach the negative (-) cable clamp to the battery post, ensuring a tight connection.
- Connect the positive terminal (if connecting): Connect the positive (+) cable clamp to the battery post, again ensuring a tight connection.
- Verify connections: Check all connections for tightness and corrosion. A loose or corroded connection can lead to poor performance or even fire hazards.
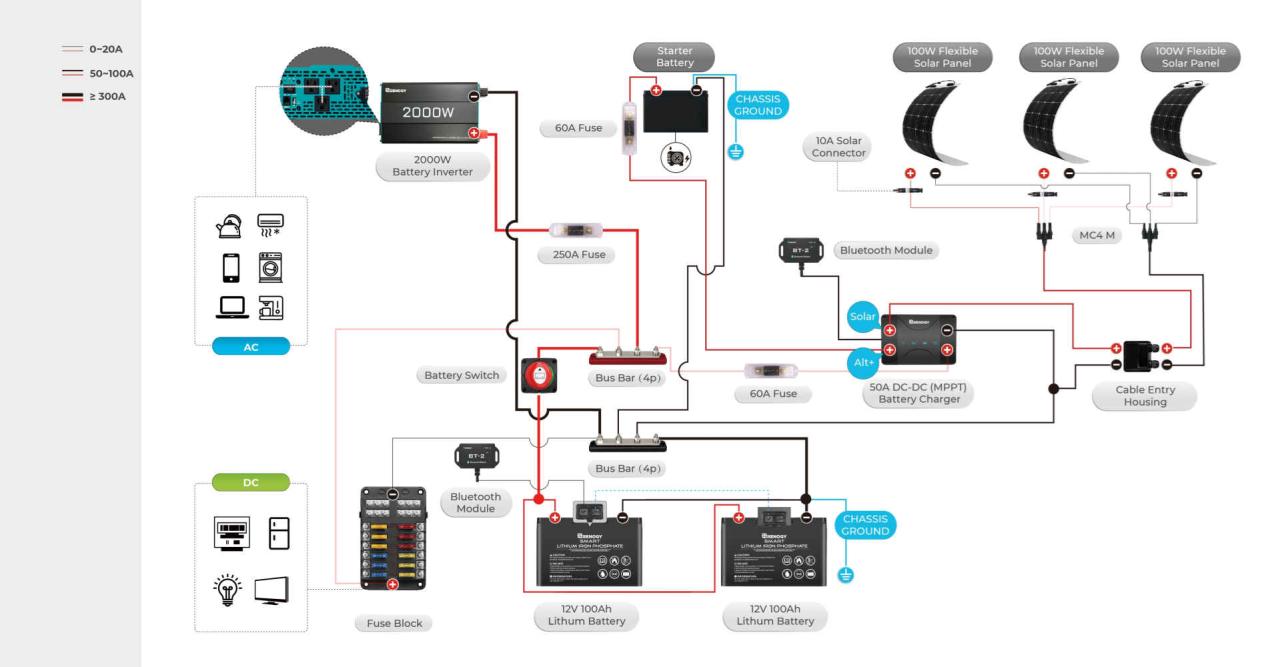
Dual Battery Setup Wiring Diagram
Imagine a diagram showing two 12V batteries labeled Battery 1 and Battery Each battery has a positive (+) and negative (-) terminal. A battery switch is depicted centrally, with four thick wires connected to it. Two wires (red, labeled “+”) run from the positive terminals of Battery 1 and Battery 2 to separate input terminals on the battery switch.
Two wires (black, labeled “-“) run from the negative terminals of Battery 1 and Battery 2 to separate input terminals on the battery switch. From the battery switch, a single thick red wire labeled “+ Output” runs to the positive bus bar of your RV’s electrical system. Similarly, a single thick black wire labeled “- Output” runs from the battery switch to the negative bus bar of your RV’s electrical system.
The battery switch itself has three positions: “OFF,” “Battery 1,” and “Battery 2.” In the “OFF” position, both batteries are isolated from the RV’s electrical system. In “Battery 1,” only Battery 1 supplies power to the RV. In “Battery 2,” only Battery 2 supplies power to the RV. This setup allows for selective use of batteries, maximizing battery life and preventing deep discharge.
Battery Terminal and Connection Maintenance
Regular maintenance is essential to prevent corrosion and ensure optimal performance of your battery system.
- Clean terminals regularly: Use a wire brush or terminal cleaner to remove any corrosion from the battery terminals and cable clamps. A baking soda and water paste can also effectively clean corrosion.
- Apply a corrosion inhibitor: After cleaning, apply a corrosion inhibitor or dielectric grease to the terminals and cable clamps to prevent future corrosion. This creates a protective barrier and ensures a clean connection.
- Tighten connections: Regularly check and tighten all battery connections to ensure a secure fit. Loose connections can lead to increased resistance and corrosion.
- Inspect cables: Periodically inspect the battery cables for any signs of damage, such as fraying or cracking. Replace damaged cables immediately.
Troubleshooting Common Battery Switch Issues
Dealing with a faulty battery switch in your travel trailer can be frustrating, leaving you without power when you need it most. Fortunately, many common problems are easily diagnosed and fixed with some basic troubleshooting. This section will guide you through identifying and resolving typical battery switch issues.
So, you’re planning a trip? Awesome! First things first: get yourself sorted with travel insurance. Check out Aon travel insurance for some solid options; they’ve got you covered for most eventualities. And if you’re an audiophile like me, don’t forget your tunes! Make sure you check out the tips and tricks for setting up your audiophile travel setup beforehand – you want that perfect soundtrack for your adventures, right?
Battery switch problems usually manifest as a complete lack of power to certain systems, intermittent power failures, or even blown fuses. Understanding the possible causes and how to test the switch itself is key to getting your trailer back up and running.
Identifying Common Problems, Battery switch on travel trailer function
Common issues with travel trailer battery switches range from simple user errors to more complex electrical faults. For instance, a switch might be inadvertently turned off, a fuse might be blown, or the switch itself could be faulty. Corrosion at the terminals can also impede the flow of electricity. Sometimes, the problem isn’t even the switch, but rather a loose connection somewhere in the wiring.
Troubleshooting Steps
Before diving into more complex checks, here’s a systematic approach to troubleshooting:
- Check the switch position: Ensure the switch is turned to the “on” position for the desired battery bank (house or chassis). This seems obvious, but it’s often overlooked.
- Inspect fuses: Check all relevant fuses in the battery switch panel and the main fuse box. Replace any blown fuses with the correct amperage rating. If a fuse blows immediately after replacement, there’s a short circuit somewhere in the system that needs to be investigated.
- Examine connections: Look for loose, corroded, or damaged connections at the battery terminals, the switch terminals, and along the wiring. Clean any corrosion with a wire brush and reconnect securely.
- Test the switch: (See next section for detailed instructions on how to do this using a multimeter.)
- Check for power at the source: Verify that the batteries themselves are charged and providing power. Use a multimeter to test the battery voltage.
Testing the Battery Switch with a Multimeter
A multimeter is an invaluable tool for diagnosing electrical problems. To test your battery switch, follow these steps:
First, ensure the switch is in the “off” position. Then, set your multimeter to measure DC voltage. Connect the positive lead (red) of the multimeter to one of the switch’s input terminals and the negative lead (black) to the corresponding output terminal. If the switch is functioning correctly, you should read a voltage reading close to zero. If there’s a significant voltage reading (close to your battery voltage), the switch is likely faulty.
Repeat this test for all input/output combinations relevant to your battery switch.
Next, turn the switch to the “on” position. Repeat the voltage measurement between the input and output terminals. You should now see a voltage reading very close to the battery voltage. A significant drop in voltage indicates a problem within the switch itself or a poor connection.
Finally, remember to always disconnect the battery’s negative terminal before performing any electrical tests or repairs to prevent accidental short circuits and potential injury.
Battery Switch and Solar Panel Integration
Integrating a solar panel charging system with your travel trailer’s battery switch offers a streamlined and efficient way to manage your power. This setup allows you to control the flow of power from your solar panels to your house battery, providing a reliable and convenient energy source for your off-grid adventures. Understanding how these systems work together is key to maximizing their effectiveness and preventing potential problems.Proper wiring and circuit protection are paramount when integrating solar panels with a battery switch.
Improper wiring can lead to short circuits, overloads, and even fires. Similarly, inadequate circuit protection can damage your equipment or pose a safety hazard. This section will detail best practices for ensuring a safe and efficient system.
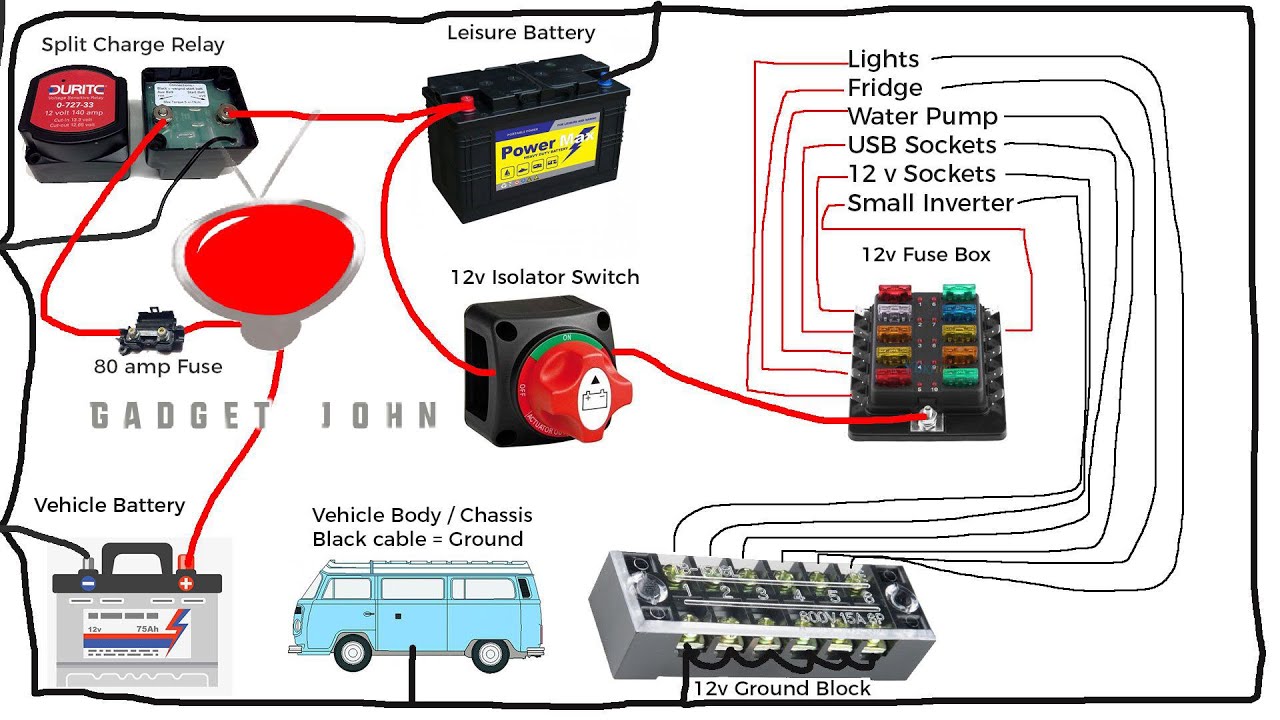
Solar Panel, Battery Switch, and House Battery Power Flow
The following diagram illustrates the typical power flow from solar panels, through the battery switch, and finally to the house battery:Imagine a simple diagram. On the left, we have our solar panels, represented by a single box labeled “Solar Panels.” From the solar panels, two wires run to a second box labeled “Charge Controller.” The charge controller regulates the voltage and current from the solar panels to prevent overcharging the battery.
From the charge controller, two wires lead to the input terminals of a third box, our “Battery Switch.” The output terminals of the battery switch are connected via two wires to a fourth box labeled “House Battery.” Finally, a fifth box, labeled “Travel Trailer Appliances,” is connected to the house battery. The battery switch acts as a master on/off switch for the solar charging system.
When the switch is in the “on” position, power flows from the solar panels, through the charge controller, through the battery switch, and charges the house battery. This charged battery then powers the appliances in the travel trailer. When the switch is “off,” the flow of power is interrupted, preventing the solar panels from charging the house battery and preventing the house battery from powering the travel trailer.The entire system should be protected by fuses or circuit breakers at various points.
A fuse should be placed between the solar panels and the charge controller to protect the controller from excessive current. Another fuse should be between the charge controller and the battery switch, protecting both the controller and the switch. A further fuse or circuit breaker should be included in the main power line to the travel trailer appliances.
Mastering your travel trailer’s battery switch is key to a smooth and enjoyable RV experience. By understanding the various types of switches, their functions, and how to troubleshoot problems, you’ll be well-equipped to handle any power situation on the road. Remember safe practices, and always consult a professional if you’re unsure about any aspect of your electrical system. Happy travels!
User Queries: Battery Switch On Travel Trailer Function
What happens if I leave my battery switch on all the time?
Leaving your battery switch on constantly can drain your batteries, especially if you’re not connected to shore power. It also increases the risk of accidental short circuits.
How often should I check my battery terminals?
Inspect your battery terminals at least every three months, or more frequently if you live in a humid climate. Clean them with a wire brush and baking soda to prevent corrosion.
Can I use a battery switch with lithium batteries?
Yes, but you may need a specific type of battery switch designed for lithium batteries. Consult your battery and switch manuals for compatibility.
My battery switch is making a clicking noise. What’s wrong?
A clicking noise often indicates a faulty switch or a problem with the electrical circuit. Check fuses and wiring before replacing the switch.
